Wednesday, May 27, 2009

Round Yoke Top from that*darn*kat

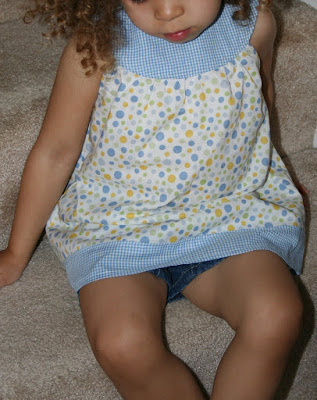
 If you read my previous post, you know that I started a top for my daughter months ago and hadn't finished it for fear of buttonholes. Well, last night, I decided it was time to buckle-down and figure them out. I did it! They really weren't that hard...I just didn't feel like it at the time months ago, I guess. I will need some more practice to get the density of stitches just right.

Round yoke top from that darn kat

The pattern from that*darn*kat is easy to follow and can be made into a top or dress. The dot fabric is one of the first fabrics I purchased when I started sewing and is super lightweight for summer. I like it paired with the gingham. I will make more from this pattern. Her summer wardrobe is overflowing already, so I may try one in a heavier weight to layer with a t-shirt and leggings for fall. I found a cute plum corduroy that will make a cute jumper.

round yoke top from that darn kat

Dabbling


See all of those pretties above? I ordered a scrap pack from Fabric Supplies on etsy. The pack contains about two yards total fabric, all full-width cuts. The ones I received are mostly 12-16 inch cuts. The shop offers a choice of three color palettes - fresh, cool, warm. Mine is warm. Shipping was super fast. The best part was opening the package to find a surprise mix of pretty prints.


I view these beautiful fabrics online but find it hard to commit to just one or two and in a larger quantity. The choices are overwhelming, because I want them all! A scrap pack is a nice way to dabble and see how the weight and finish of different fabric lines compare. Although I haven't cut into these yet, I imagine they will be great for making smaller projects such as zip pouches, clutches, patchwork projects, garment trims, etc.


I thought I'd share this for other new sewers who want to add some fun to their stashes.

Crayon Roll


Crayon rolls are a nice instant gratification project to finish in one relatively short sitting. It is also a great project to use scraps from your fabric stash. I made a few for birthday party gifts recently using this tutorial from Chocolate on my Cranium (great blog name, huh?). I had not made one for my daughter who asked me last week for her very own "crayon box", so I sewed one last night. This one I managed to turn into a not-so-short project by accidentally cutting through a piece of the fabric. After that I had to regroup a bit and the end product turned a little weird and wavy because the interfacing ended up on the wrong panel and another piece was thick with too many layers. That's okay...my daughter doesn't seem to mind. I chose these fabrics to coordinate with the Simple Tote I made her for Christmas.

Monday, May 25, 2009

Dressed-up Buttercup

My latest project is a Buttercup Bag from made by rae's free pattern. (how awesome of rae to provide such a great pattern??) I decided to dress-up the handbag by using a piece of dupioni silk I had on-hand. I initially bought the silk to make a clutch to carry to a wedding. (I didn't get around to making a clutch, and instead finished the edges of the piece with a narrow rolled-hem to make a scarf to cover my shoulders during the chilly outdoor wedding.) The lining is a mustard, gray and white paisley quilting cotton found at the local Hancock. I saw the fabric, loved it and bought 3 yards (at $1.99 per yard, why not?) not knowing what I would make with it. I was pleasantly surprised to see how well it coordinated with the gold silk. The silk made for nice sharp pleats and was not too difficult to work with, although it frays quickly.
The handbag was a gift for my mother-in-law who generally carries much larger bags. I hope that the small size and silk fabric will make it a nice option as a special occasion bag for a dinner or church outing. Since I wanted it to be almost clutch-like, I kept the handle very short, so it can be held daintily (not sure that's a word, but you get my vision, right?) during a night out!
Monday, May 18, 2009

Gifts


For Mother's Day, I made this tote for my Mom. The pattern is "Amanda's Bag" from Marlous Designs. Marlous happens to be a special family member of ours, so I think that made the gift even better for Mom. The main fabric is a home dec weight I thought she would like. The lining and contrast are quilting fabrics. All were found at my local Hancock Fabric. The pattern calls for the bag to be quilting with a layer of batting. Since I am not a quilter, I just added a layer of fusible fleece. Now that it is finished, I don't know if that was a good move, as the bag is a little floppy. I may have to revamp the bag and add some rigid interfacing (...or just learn to quilt). The pattern is great and gave me a nice challenge adding a zippered pocket. The zipper pocket is hidden behind the front pocket panel. It should have been visible on the outside of the front panel, BUT I had a mishap with a very hot iron and reversed the outer pocket panels to hide a lovely scorch mark. I like the contrast that the green floral fabric adds. Behind all of those diagonal trim pieces lies a pocket, so in total there are five outer pockets and also a row of inner pockets in the lining bag. The bag is quite roomy. All in all, a success.


My sister-in-law's birthday is approaching and she visited us over the weekend from Toronto. Since she is working on her vegetable garden again this year, I thought a gardening apron might be needed. I just made up this design as I went, knowing that I wanted the apron to have lots of pockets, with some expandable ones for garden gloves, clippings, etc. The floral pocket panel is made from a thrifted kitchen towel sewn in half lengthwise. I then made some inverted pleats to make the two center pockets gusseted. The main fabric is a home dec weight gingham. I used pre-packaged bias tape to finish the top seams and make the ties. Although the colors of the gingham aren't exactly dirt friendly, I like the cheery combination!

Thursday, May 7, 2009

Are buttonholes really that difficult? aka ... the Tale of the Unfinished Top


So, I started a top for my daughter many months ago from the that*darn*kat pattern. It is super cute and...unfinished. I just keep avoiding figuring out buttonholes. (sort of like avoiding finishing our taxes after filing for an extension...I am a procrastinator specializing in avoidance) On my machine, you just use a zig zag stitch and then cut the opening. I tried it once, briefly and unsuccessfuly, and haven't gone back to it. My daughter tried on the top and everything and it fits (for now).


Ugghhh. I must stop dragging my feet. It feels good to get that off my chest :)

Sunday, May 3, 2009

Everything Tote in Orla Kiely


My second finished project from Heather Ross' Weekend Sewing is the Everything Tote. I wanted to make a tote perfect for summer trips to the park and farmer's market, so the pear print seemed perfect. Some may recognize the pear fabric - it is the Orla Kiely dishtowel everyone scooped up at Target a month ago. I used the solid green towel for the handles, bindings and pockets. The lining is an unfinished cotton I had on-hand. To give the bag more body, I added a cotton flannel layer inside. I decided not to add gathers to the bag; it was just too difficult with the extra flannel layer and I just wanted to move ahead with the project!


Because the towels were a bit small to fit the pattern, I redrew the main pattern piece to reduce slightly. Even with the pattern reduction, the bag is still huge! I should mention that I ripped out all the seams on the pear print towel (yes, it took forever) to add about 3-4 inches of width and length. Also, since the pear pattern is directional, I had to cut the main body panels as two separate pieces.
As many have commented in the flickr group discussion, the instructions for the binding and handles are a bit curious. I will say that to achieve the look shown in the book photo, with inch wide bindings, you cannot follow the book instructions. The instructions call for the bindings and handles to be attached similar to bias tape. If you do that, your finished binding will only appear about half an inch wide. For my binding and handles, I just pressed the pieces in half and sewed on. It was tricky sewing, but I like the outcome, where you can see a little of the lining along the edge of the binding. As you can hopefully see in the picture, I sewed the handles in half only just past the body of the bag and left the rest open, so the lining fabric will show and so the wide handles will be comfortable on my shoulder.


For the interior, I added two large pockets, one divided. I also added a loop of fabric with some elastic sewn down the middle. It is hard to see in the picture, but the fabric loop is just sewn perpendicular into the side seam of the lining bag. What is the purpose, you ask? I want to carry a refillable water bottle or coffee tumbler upright in the bag. Let's hope it works.


My daughter thinks it makes a great messenger bag!