Showing posts with label sewing. Show all posts

Monday, September 29, 2014

Supertote in Anna Maria's Ghostwing

The Supertote by Noodlehead is as super as you've heard!!  This is my first time using one of her patterns, and it definitely lived up to the reputation - quite thorough with nice details that make the bag special and functional.  I actually made this bag as part of a class at a local shop - SEWN Studio.  It was nice to have dedicated sewing time, especially for an intricate project like this.  I learned some great tips along the way from our instructor and tried some new skills such as making piping and installing a recessed zipper.  
Supertote


My main fabric is the gorgeous Ghost Wing print by Anna Maria Horner.  It is a linen-cotton blend and the colors are just amazing.  For the gusset, I used a dark denim from my stash. I have seen some nice versions of the Supertote using Ghost Wing and a natural linen, which i contemplated.  In the end i went with the darker denim so the bag could be a little less fussy (read:  not as prone to picking up dirt).  The dotty lining is from Kaffe Fassett and I found it locally at Silk Road Textiles.


I don't really enjoy making straps and wanted something sturdy, so I picked up some jute webbing.  Because I was only a day or two away from the scheduled class, I found this at Hancock in the upholstery section.  Next time I will shop online where it is much, much less expensive.  


The denim gusset was actually a redo.  Initially, I used a light brown linen-blend and just didn't love it.  I doubted it all along the way, and only decided to start over once the gusset was fully attached.  Of course...  I should have listened to my gut sooner.  I used one of the aforementioned tips learned during my class to rip the seams  - my husband's hair clippers ripped the seam right out.  Have you tried this?  Amazing!  Fast! And he didn't know the difference after I blew away the lint ;-)


I followed the pattern closely, but added just a couple of variations.  I divided the inner pockets - one into two sections (large enough to fit diapers and wipes) and one into three sections (great for smaller items).  I added an additional hidden pocket to the large outside pocket.  It's a small slip pocket near the top to hold my phone.  I'm so glad I did. This bag is so large, I would never find my phone!  I may add a clip for my keys for the same reason. 


Initially, due to its size, I didn't anticipate carrying this bag as my main purse/tote, but I have.  It is large, yes, but not bulky at all.  And it holds everything I need - regular purse stuff, plus my water bottle, toddler supplies, book, mail, etc.  A magazine slips perfectly in the outside pocket.  

I've carried this bag for over a month and have been happy.  I will add a key clip as mentioned.  One thing I will pay closer attention to next time is slightly increasing the size of the lining (top to bottom dimension).  I seemed to have sewn it slightly smaller than the outer bag.  When the bag is loaded up, the top of the bag sort of pulls inward as you can hopefully see in the photo below.   Adding a little length should solve that issue.


Next up, I plan to make a slightly downsized Supertote with a cross-body strap for my 9-year old.  

Prefontaine Shorts for my girls

This summer, I made two pairs of Prefontaine Shorts by Made by Moxie. I bought this pattern as part of the Perfect Pattern Parcel.   This is such an easy pattern to sew up, with big results.  Love these shorts.  The shorts are bound with strips of t-shirts. Genius!  Cutting and applying the binding was so easy.  I immediately starting thinking of other applications.

Girls Prefontaine shorts by Made by Moxie

 This floral pair is one of the Briar Rose prints from Heather Ross.  This is the smallest size and fit my almost 2-yr old perfectly.  The teal pair are for my oldest daughter.  The fabric is upcycled from an old summer dress of mine and is the softest cotton.  Both pairs received alot of wear this summer.


And the pockets are a hit with the toddler set!


Pea Pod Baby Carrier

How cute is this Pea Pod Baby Carrier that I made last fall?  It is a free pattern by Sascha Romeo featured on sewmamasew in 2010. The Pea Pod is designed to carry an older baby on the hip. This was easy to sew and a fast make – my favorite kind!
 20131113-092126.jpg
The fabrics are both home dec weight from IKEA. I’ve had that grey print since I first saw it popping up in bags and other makes on the interwebs a year or so ago. I love the burst of white and like the corner placement I chose on the carrier.
I didn’t have fusible fleece on hand so I just used some warm and natural batting and added the random quilting lines to secure it to the orange lining piece. The buckles were ordered online from Strapworks
 20131113-092139.jpg
This orange and grey combination makes me happy :-) . I haven’t used the colors together before but after i made this realized I have several things pinned with this combination. And I recall watching a Tennessee Vols football game recently and admiring their orange and grey uniforms. It’s what you notice when you watch football, isn’t it? Use of color and pattern and……
 My baby is 14 months in the photo. The fit is nice for her and comfortable for me.

20131113-092151.jpg
20131113-093526.jpg

Wednesday, August 31, 2011

BBB Pants in Giraffe Fleece


Earlier this year, I made another pair of Rae's Big Butt Baby Pants. These are done in fleece from my stash. These are my third pair of BBBs. The pattern sews up quickly and is perfect for fun kid prints.


These were cut in the 12 month size, but in the spring they were too large for my nephew ...and now that fall weather is approaching and the boy is growing, the pants are likely too small! In an attempt to make them still wearable, I cut off the bottom hems and added the 3 inch gray bands to the legs.


How cute is this giraffe??!

Wednesday, August 17, 2011

The Crepe

So. I didn't quite adhere to Gertie's Crepe Sewalong schedule. I started with Gertie in December....and finished nearly eight months later. I just didn't want to rush things...or more accurately, I am a procrastinator who allowed the near-finished dress to hang on my dressform for months because I hate hemming.
The pattern is the Crepe by Colette Patterns. My fashion fabric is a medium-weight cotton purchased from Denver Fabrics online (still available here). The navy and cream cross-hatch pattern is set on the diagonal and is incredibly flattering and wearable. I underlined the entire dress with a navy cotton batiste to add body and opaqueness to the dress.
Crepe dress


Along the way, I made a few adjustments to the construction to make the dress my own and suit my personal style. The simplest alteration was adding length to the ties (about 6 inches) so that I could tie them in front rather than back. I knew that a back bow wasn't my style necessarily and would not allow me to add a cardigan on top. I also removed the curve from the sweetheart neckline. Finally, I cut about 3 1/2 inches from the skirt length for a knee-length hem.


I hesitated adding the pockets concerned about adding bulk in the hip area, but they really are *essential* to making this a great dress. I love them...not that you can tell from my so-so expression in the picture!


Fitting the bodice of my Crepe was a long process. My first issue was that I just started with the wrong size. I cut my first bodice muslin as a 10 and quickly realized my mistake. Next I cut an 8 and still made many adjustments. Some of my adjustments were apparently lost during transfer to my pattern, because once the fashion fabric was cut and the bodice sewn, there were still significant fit issues to overcome. At that point, in my head, I heard Tim Gunn saying "make it work"... and that I did. I just started pinching and tucking the excess fabric and realized I could carry those tucks directly into the line of the sleeves (on both the bodice front and back) creating a more flattering sleeve shape in the process. An unorthodox method, but it somehow worked for me! With the busy fabric it is difficult to see what I did, so I will take some detailed pictures another day and show the adjustments.


The new sleeve shape and neckline is much more flattering for me.


I love the finished look that the underlining adds. This was my first time following the steps of a sewalong and I learned some great techniques, such as underlining and using silk organza to stabilize the neckline. Because I enjoyed Gertie's instruction, I recently purchased her online Perfect Fit Bombshell Dress class on Craftsy.

Wednesday, August 3, 2011

Simple Skirt in Madras

A month or so ago, I whipped up a skirt for my daughter using Dana's Simple Skirt tutorial. The fabric is a super-soft madras I scored on clearance at Hancock for $2/yard.


Elastic waist skirts are a nice instant-gratification project. And so easy for little girls to wear in summer.


I addded a 3 inch ruffle hem. Since I cut the fabric on the bias, I kept the edges raw so they would fray nicely after washing. Easy. Cute. Done.


Sunday, May 8, 2011

A Simple Summer Top :: McCalls 5388

McCalls 5388 is my one entry in Rae's Spring Top Sewalong for 2011. I had grand plans to put some of my fabric and patterns to use, but found no time for execution! The fabric is a cotton lawn I picked up in Joann's red tag area for $1/yard a couple of years ago. It is quite light and soft and will make for a cool, breezy top in the summer heat.


The pattern is straightforward. I sewed View C but skipped the ruffles, so the top is really quite simple. For the back, I cut two pieces to allow for a swayback adjustment. (Sorry, no rearview pics; my 5 year old photographer only snapped a few at my request. Note, having a shorty take your photos is not flattering for the ol' double chin....) If you are planning to sew one of these up, know that the neckline is as low as the pattern envelope photo shows. I cut a size 10 (and wear an 8 in RTW clothing), but once finished I realized I should have cut a smaller size since the front was falling foward and exposing quite a bit when bent over. Since I had already bound the armhole and shoulder seams in bias tape, I did not want to pick the seams apart. Instead, I took vertical tuck in the center of the front yoke. (Later, I will add a close-up photo to show this.) With the gathered bodice, the tuck blends right in. The final fit is much better with the small adjustment.McCalls 5388

Thursday, April 7, 2011

Quick Kid Projects

For Christmas, I made these Composition Book Covers for my daughter and niece using two fabrics from Amy Butler's Love collection. I just winged the pattern based on the book measurements. If you look closely you'll notice that I sewed the pencil pouch upside down on my daughter's! No worries, it still holds the pencil snugly. 
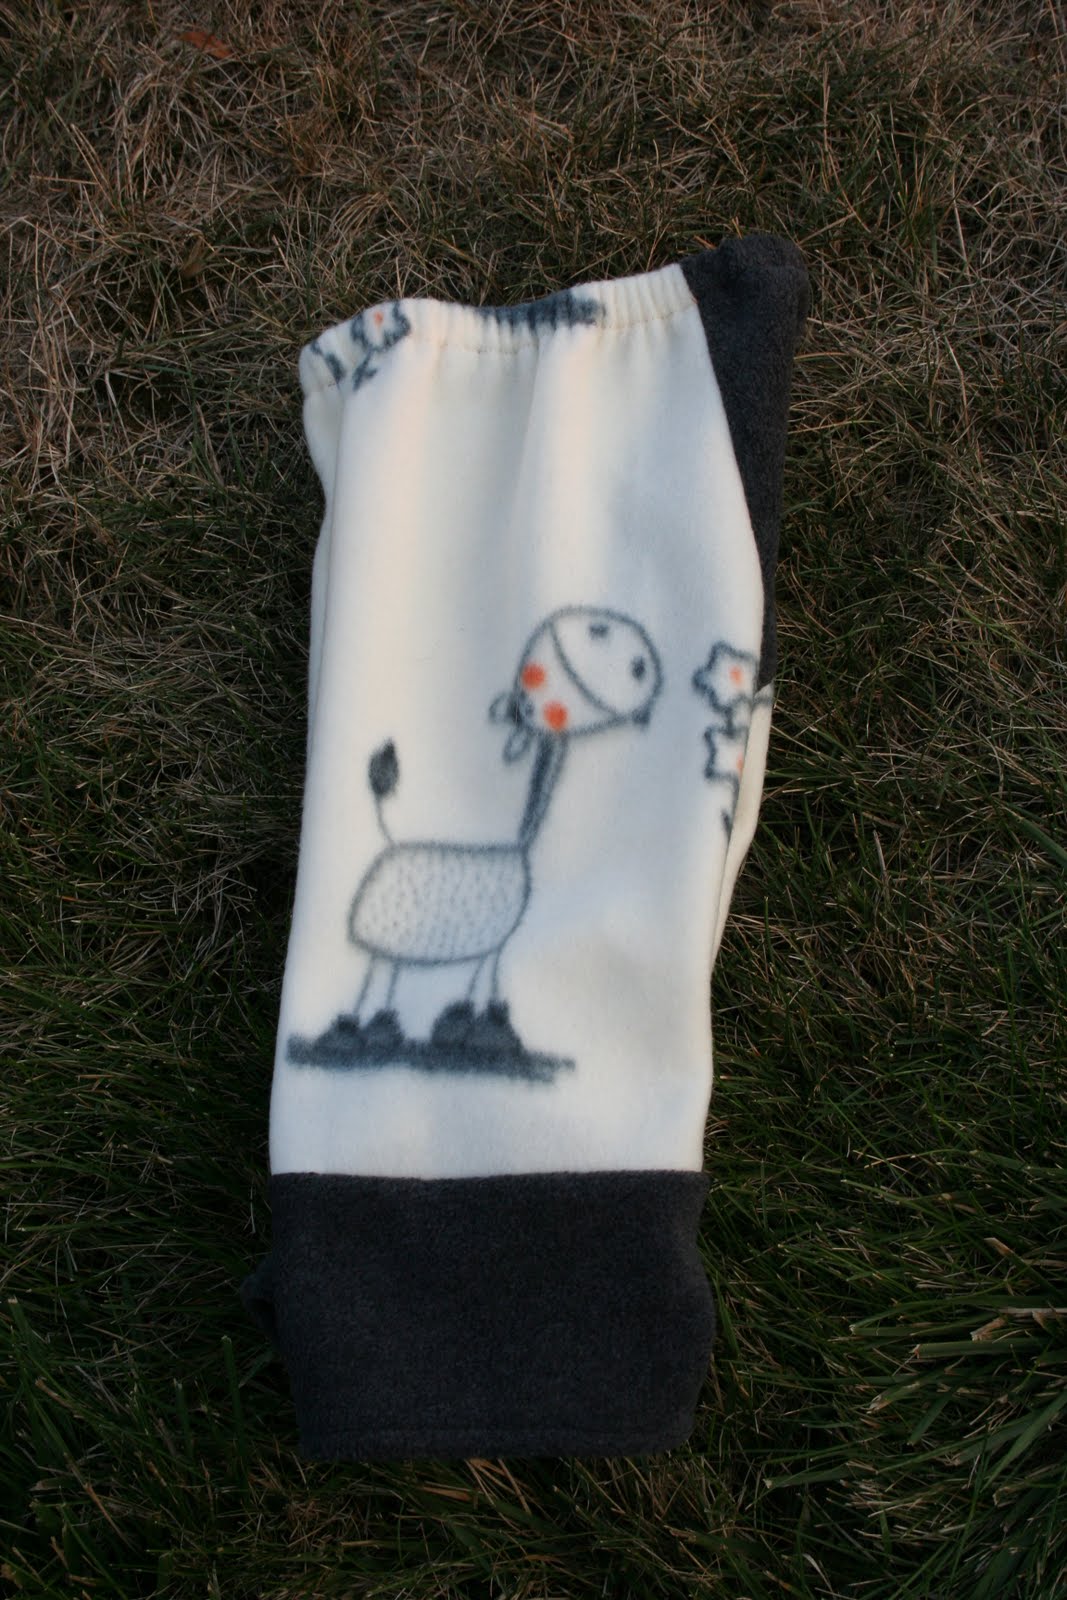
This fleece robe is from New Look 6847, a versatile patttern, with options for unisex kids robe and pajamas (woven bottoms and knit tops). So far, I have only sewn the robe pattern.The fleece was chosen by my daughter at our local Hancock Fabric. I let her choose anything she wanted (but did strategically steer her away from the licensed character prints!). I have found that fleece is so easy to work with. Fleece edges don't fray, so for the pockets, I just pinked the edges and topstitched the pockets right onto the robe. When sewing with fleece, I have used a regular straight stitch, although I've read that a stretch stitch is best. Rather than make loops to hold the belt, I just stitched it right to the back of the robe. One of my robes is finished this way and it makes so much sense, rather than always matching the belt to the robe after laundering or constantly rethreading the belt through the loops...especially for a little person.

Thursday, January 13, 2011

Kitschy Kitchen Apron

This is the Kitschy Kitchen Apron from the One Yard Wonders book. If you are in need of a straightforward, instant-gratification project, this book is full of options. Since I've used so much Amy Butler fabric lately, I took a break and used this butterfly print from Tina Given's Treetop Fancy. The dot is something I picked up at Hancock fabric a year or so ago...and super cheap as the dots are way wonky after washing. I didn't even attempt to align the dots when cutting. The flirty ruffle detail is super cute!
I am loving this color combination. My fabric stash is heavy on oranges and greens, so it is nice to use some fresh colors. The colors are best represented in the first photo at the top. (Boo for dark winter evenings that don't allow for natural light photos after work.) As with most aprons, this pattern is simple and easy to execute. I added the contrast band at the hem for additional interest. I cut a strip the same dimensions as the waistband and applied with the same method to make the bottom hem feel neat and finished. With the added band, this apron hits me (~5' 3" height) just below the knee.

I attached the apron ties to the front of the waistband rather than the back for a different look. These buttons were purchased for another project that never came to fruition and the color matches perfect. I love when things work out so easily!

By the way, these photos were taken in my brand new sewing space!! We just finished our basement and I was able to claim a room to be all mine. I'm super-excited and once the room is organized, I will do a big reveal here. Yay for dedicated creative space.

Sunday, January 2, 2011

Pillows in Amy Butler

Amy Butler Geisha FansI made these pillows for my mother-in-law for Christmas. They were well overdue as she picked out the fabric from my stash last Christmas! The design is similar to the pillows I made for our family room in late 2009.
Other than the brown linen, all of the fabrics are Amy Butler from my stash - the main fabric is Geisha Fans in Clay (Lotus Collection), the accent is Seeds in Okra (Belle Collection) and the stripe is Oxford Stripe (Lotus Collection).


Wednesday, December 22, 2010

Coloring Wallets

These coloring wallets were made at a friend's request. She is gifting them to her nieces for Christmas. The design is a basic crayon roll enlarged to hold colored pencils or markers and with a pocket to hold a standard size scratch pad. I love the interior fabric, Always Peace by Michael Miller, designed to look like doodling on notebook paper. The main exterior fabrics are both from Amy Butler.

Tuesday, November 2, 2010

Snow White - Simplicity 2817

Simplicity 2817 for my sweet girl. Of course, I think she's the cutest Snow White...ever! I actually bought this pattern over a year ago during a Hancock 99 cent sale. The two blue fabrics are cotton/poly broadcloth. The yellow and pink were picked up from the bargain table....a polyester of some sort, I assume.

The pattern was fairly easy to follow and offered me some new challenges - piping, applique, sewing with "slippery" fabrics. I made only a few adjustments to the pattern, adding velcro closure rather than a zipper (easier for playing), forgoing the bow on the headband, and not adding the stand-up white collar around the cape. The bodice runs a bit big, but that will help the dress stay in dress-up rotation for a year or two. Simplicity 2817
We were rushing to go to the zoo for Hallzooween one Sunday and I ran into *issues* making the white collar. My daughter tried on the cape and said "I think it looks finished without the white part". I hugged and kissed her and told her that she made my week! I also grew tired of fussing with the hem....and decided to cut it with the pinking blade of my rotary cutter! It works just fine without a proper hem. I may finish the hem at some point, or I may not!

Thursday, August 26, 2010

Big Butt Baby Pants

Awesome name for a pattern, isn't it? If you follow Made by Rae, you have probably seen Rae's new pattern for Big Butt Baby Pants. Although my only "baby" who just started kindergarten (insert sad mom face here) can no longer fit this pattern, there are babies in my extended family....who may or may not be big-butted. Guess what? They are getting new pants in the near future!

The pattern is available as a pdf download, includes two pattern pieces and is sized for newborn to 2T. The pattern offers variations for foldable cuffs and butt ruffles. Rae will post instructions for pockets. The back insert allows for easy fitting over cloth diapers...thus the big butt name.

The main fabric is "XOXOXO, The Cat" by Wendy Slotboom for In the Beginning Fabrics, ordered sometime last year. The accent fabric is a quilting cotton purchased at Hancock. the print reminds me of martini olives! Cheers!